Running Training
With alwaysAI, you can train a model using transfer-learning from one of three model architectures that have been pre-trained on the COCO Dataset: MobileNet-SSD, YOLOv3 or YOLOv4. We offer a simple, cloud-based training interface that you can find here. You need an alwaysAI platform subscription to receive training hours on our cloud GPUs, so reach out to sales to get a demo and a trial.
Train on alwaysAI Hosted GPUs in the Cloud
Upload a Dataset
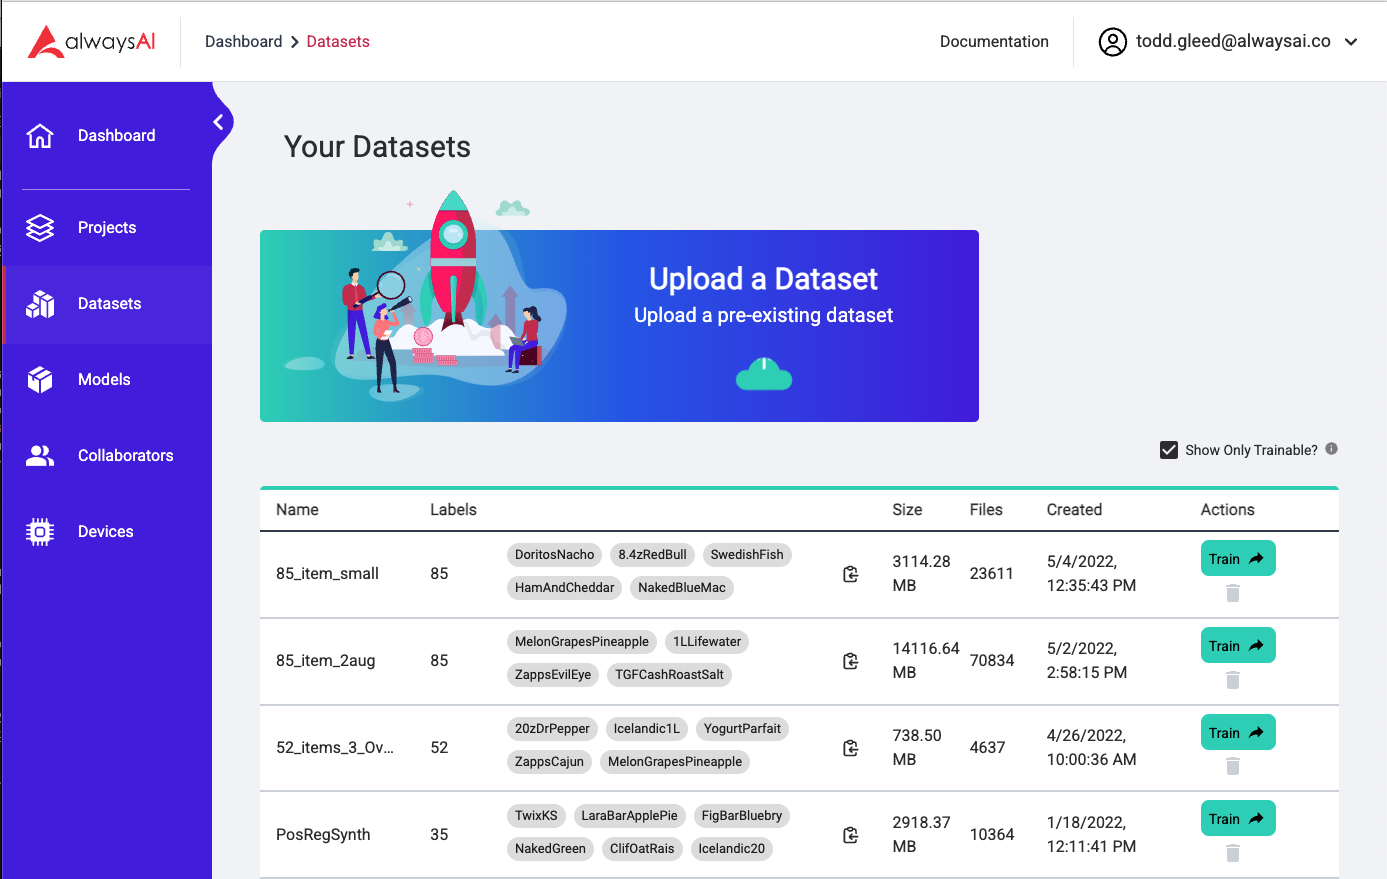
Step one is to upload a dataset. The first time you train on a particular a dataset, you need to add it to your personal dataset library. Navigate to the Datasets tab using the left side nav and click on the large box that says Upload a dataset. (See below)
This will bring up the dataset upload modal. Click to browse or drag an annotated dataset to the upload box. We accept Pascal VOC and COCO datasets. If you have annotations in another format, don’t hesitate to reach out we can help you convert to format we accept. The dataset needs to be a .zip file, the contents of which depend on the type of dataset that you are using. You can learn more about creating a dataset on the Data Collection page and the Manage Data page.
Once you have chosen your zipped dataset, you will be able to name your dataset and set the Train/Validation ratio. This is the percentage of images allocated for training, with the remaining percent saved for validation. Default is 0.7, or 70% of your images used for training. Use the slider to change the value; typically if you have a larger dataset you won’t need to allocate as high of a percentage to validation because even a small percentage will result in enough validation images.
Select a Dataset
Once your dataset has finished uploading and has been processed, you can select it for training by clicking the Train button to the far right of the dataset table.
The dataset table has a lot of useful information about your dataset. We have included the count of the labels as well as a list of each label that can be copied to your clipboard. You can compare datasets using the “Size” column, which gives you the file size, and the “Files” column which gives you the number of images that you uploaded.
If you are training a dataset that you have previously uploaded, you can select a dataset directly from the dropdown on the model training screen. If you wish to train with a different dataset, you can remove selected dataset by pressing the X. Pressing the “Change Dataset” button will take you to the Datasets page so you have more information to inform your decision. You can then select another one or upload a new one just like before.
Configure Training
Once you have selected or uploaded your dataset you need to enter a name for your model in the specified text box. One thing to note is that spaces are not allowed so use hyphens or underscores in place of whitespace. You can also leave this field empty and it will choose a random name for your model.
If you enter the name of a model that you have previously trained, you have the option of checking the “Continue training from previous version” box. If there are past versions available, they will appear in a dropdown box. If you select one of these versions, instead of starting from scratch, your training session will pick up from where the last version left off, which will save you time.
Note: If you want to continue from a past session, you must use the same model architecture you used before, and your dataset must contain the same labels..
The next thing you will do is select which base model you want to use for this training session. From the dropdown select either mobilenet_v1, yolov3, or yolov4. Which model is best for you depends on your usecase, but any of the architectures we provide can be run on edge devices.
Select the number of epochs and the desired batch size for your training session. You can read about epochs here, and more about batch sizes here.
Image Input Size is where you can configure the dimensions that each image will be resized to for this training session. Each base model has pre-determined values for small, medium, and large models. There is also a custom option where you can enter any dimensions you want, however if you choose this option for a YOLO model you must enter the same number for width and height and it must be divisible by 32. We recommend using one of the pre-set dimensions.
Note:The "Image Input Size" is not the current size of your images. Each image in your dataset will be resized to the given dimensions at runtime, and if the input images are smaller than given dimension the images will be padded..
Run Training
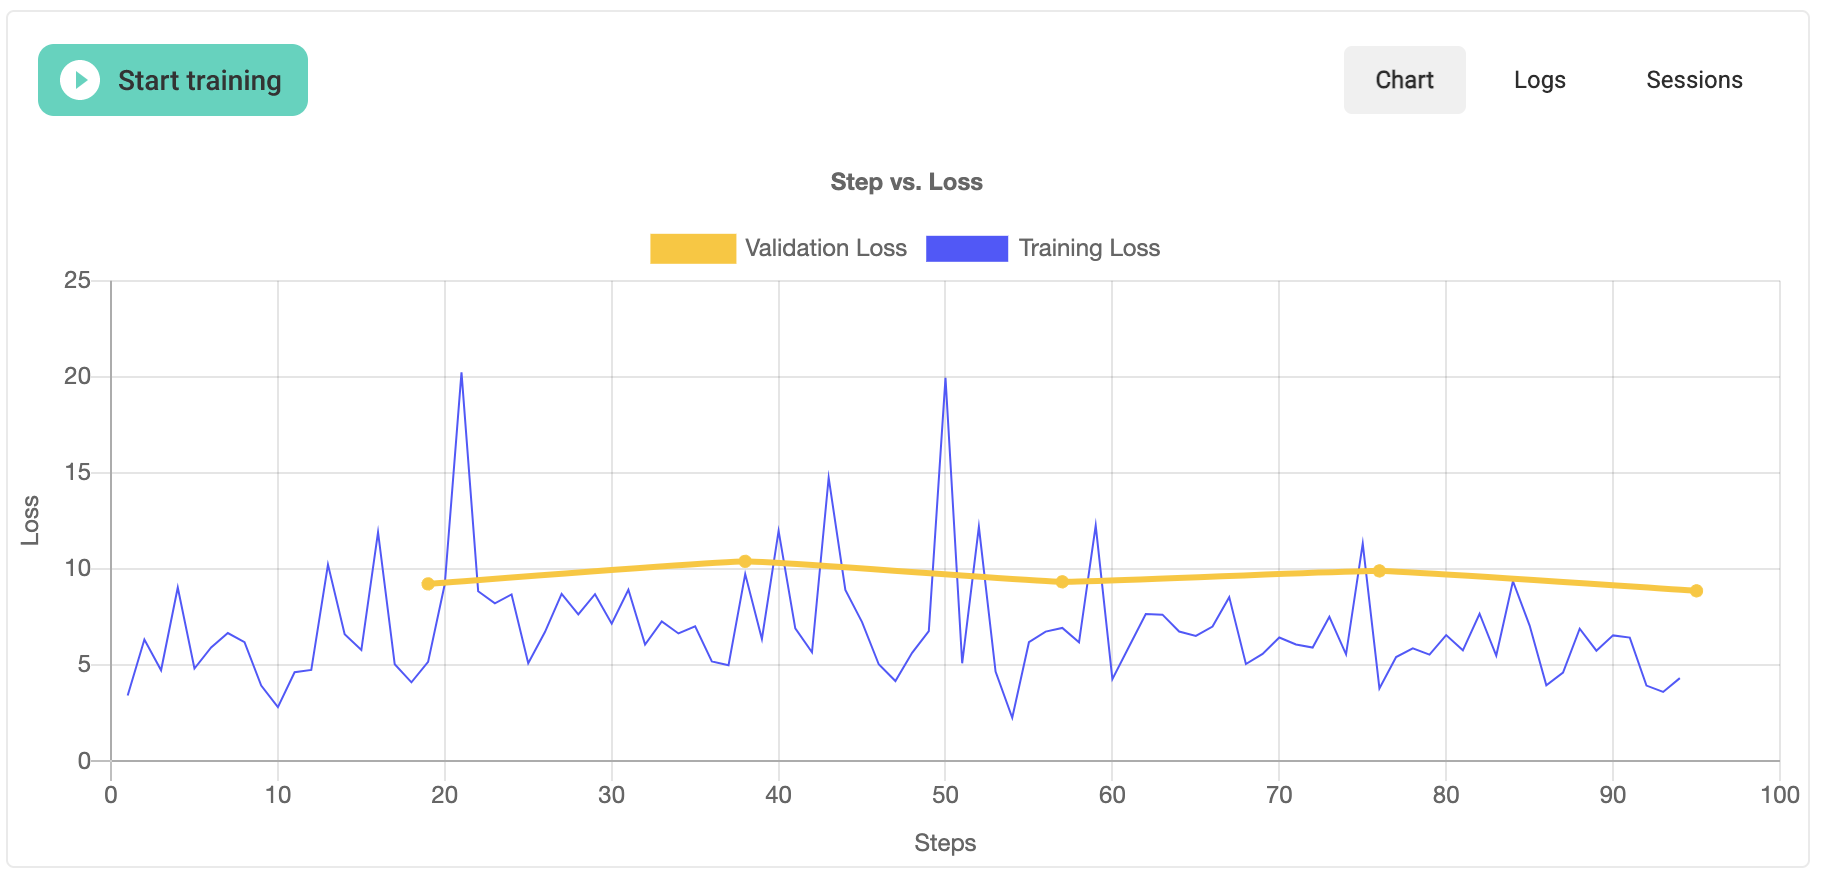
Press the Start Training button to begin training with the specified configurations. While training is running, you can view both a plot output as well as log output. An example of log output is shown below; skip down to the training output section to view an example of the plot output.

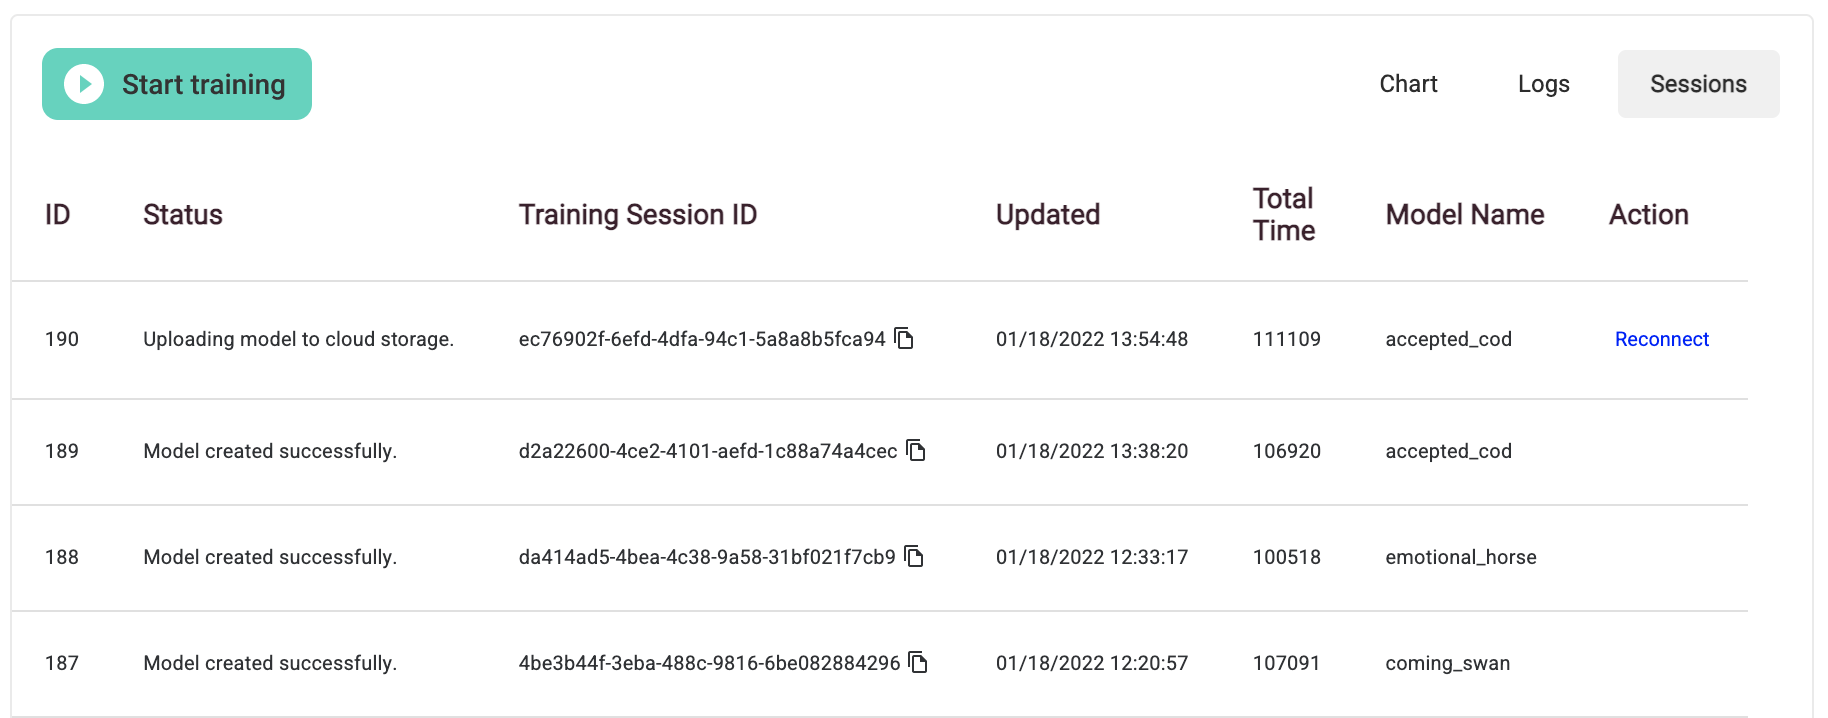
You can also reconnect to any running session if you navigate away or accidentally close the window. Simply click the Sessions tab on the top right of the training output display. Simply click the reconnect link on the far right of your training session and it will reconnect you. Note that this may take a few minutes.
Stopping Training
You can stop training at any time by pressing the Stop Training button. Otherwise, you will see output similar to below once training finishes.
Training Output
Training loss is plotted after each step; validation loss, shown in yellow, will be output after every epoch. You can read more about training and validation loss here. An example of the training output is shown below.
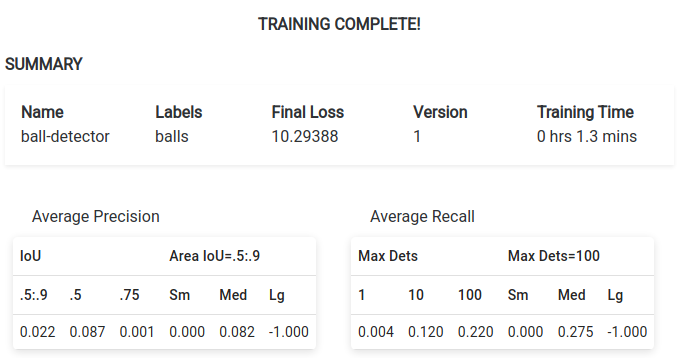
Once training finishes, you will also see output below the plot that provides you will a summary of the newly trained model’s details including the name, labels, final loss, and the version number, as well as average precision and recall.
You will also be provided with text that you can copy and paste into your terminal and app.py files in order to use your model in an application.

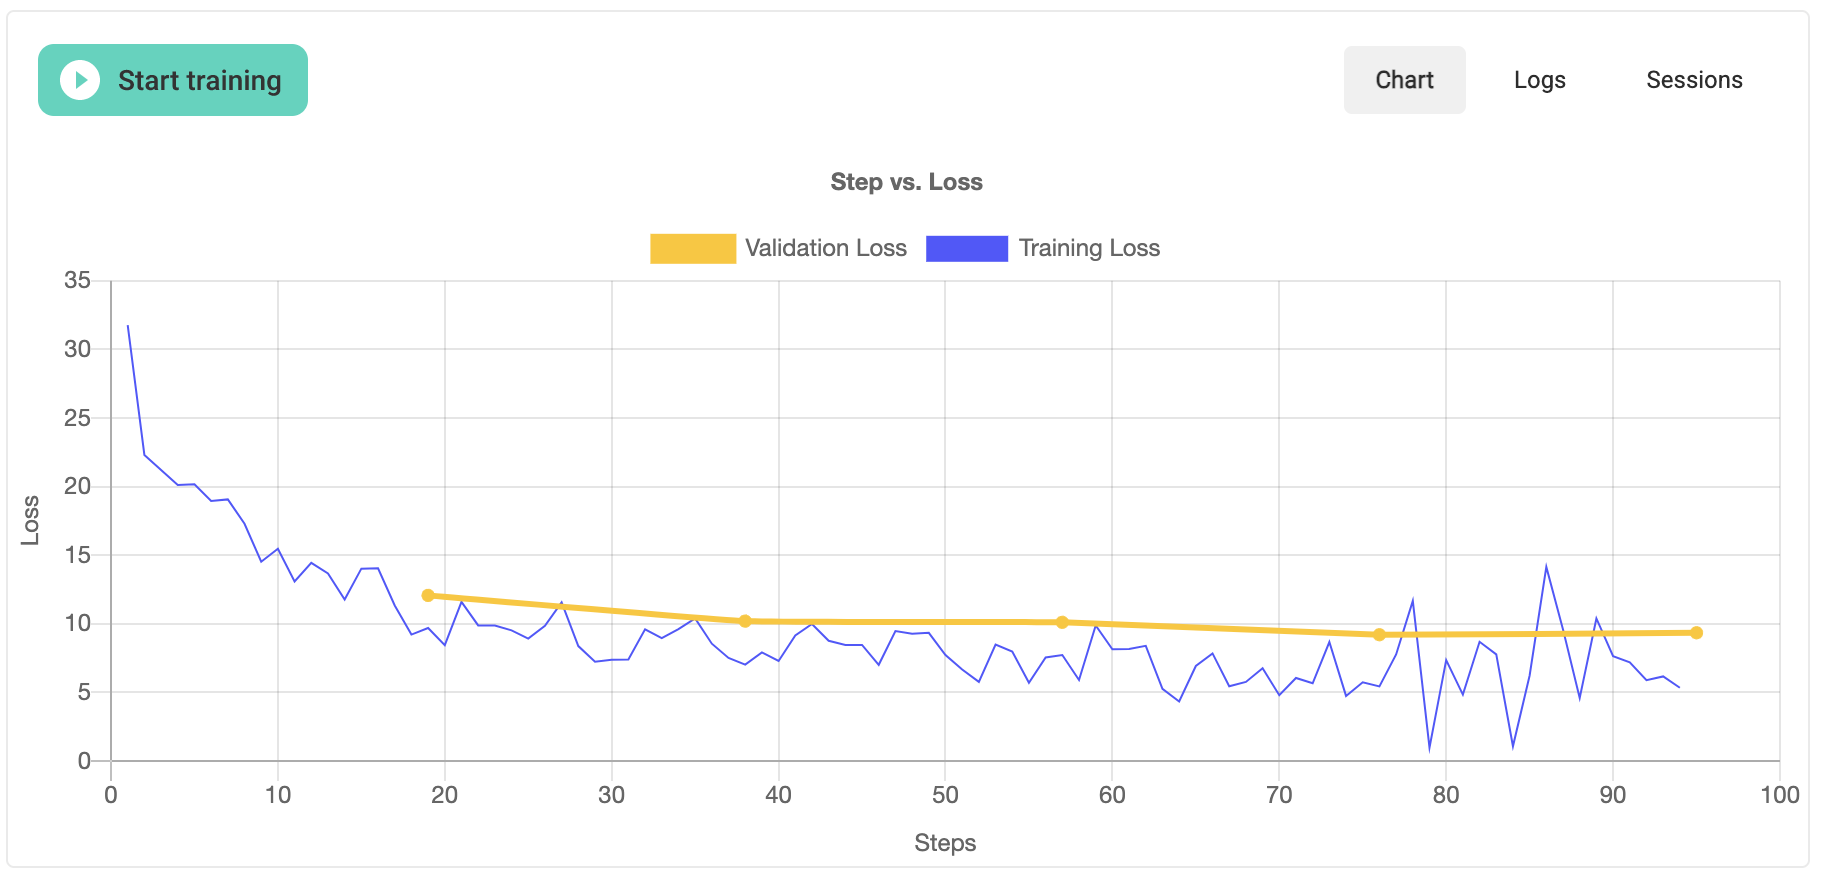
If you would like to train your model further, you can enter in the same Model Name, update the number of epochs and batch size if you choose, and click Start Training once more. Steps will start from one, but loss should be lower than in the previous training, as you can see from the example below. When continuing from a previous training session, you must use the same type of model (MobileNet or YOLO) that you used before. In addition, you won’t be able to change the Train/Validation ratio between sessions.